POKéMON SNAP!

Review- A Review of what this game is like. Is it worth buying?
Codes- Codes and Tips to help you out
Walkthrough- A complete and extensive Walkthrough
REVIEW

There have been many odd videogames since the inception of the home-console, but perhaps none so off-the-wall as Nintendo's Pokemon Snap for Nintendo 64. It is a game centered around Japanese phenomenon turn American pop culture -- Pikachu and gang -- Pocket Monsters (or Pokemon for short). And while this certainly isn't a weird concept in itself, the backbone supporting the game -- that of snapping photos of the crude Pocket Monsters that inhabit it -- is definitely a bit wacky.
Naturally, when IGN64 first previewed the game more than a year ago -- then running on 64DD hardware -- we immediately chalked it up as one of those crazy Japanese fads that just doesn't translate to America. Bear in mind that this was before the craze that is Pokemania had invaded the States and turned our nation's children into Pikachu-starved lunatics hell-bent on anything and everything related to the Nintendo-created monsters. But even if the US had been subject to the Pikachu hype at the time, we probably still wouldn't have predicted a game primarily centered around picture-taking would carry over into the US.
It seems, however, that Nintendo was right and we were wrong.
Pokemon Snap is, at its core, a game about snapping photos of Pocket Monsters in order to earn points -- and it's on rails. But through clever design, intuitive control, lots of traditional secrets and, of course, more than 60 Pokemon to snap pictures of and toy with, it's a game that is a lot of fun in spite of its seemingly simplistic design and nature.
The Facts
- Snap pictures of your favorite Pocket Monsters in 3D environments.
- More than 60 Pokemon.
- Seven levels.
- Save 60 of your favorite photos to cartridge.
- Interact with Pokemon by throwing objects at them, playing songs, etc.
- Loads of hidden characters and secret signs.
- Create your own Pokemon album.
- In a smart marketing feat, Snap owners can bring in their cartridge and print up special sticker-sheets of their favorite Pokemon characters. Note that this is only available at participating Blockbusters. Click here for details.
- Rumble Pak support.
Gameplay
The premise behind the HAL-developed Pokemon Snap is simple: Players roll through 3D environments (on rails) and try to snap the very best possible pictures of various Pokemon characters. Of course, there is a lot more to it than that. The game features seven big levels (fully 3D polygonal backdrops and characters) and more than 60 Pocket Monsters. That's a lot of picture snapping. Adding strategy to the process, players need to accomplish a number of different tasks before certain Pokemon will respond (either purposefully or accidentally) and pose for the camera. For example, in the game's Beach level, Pocket Monster Snorlax (also known as IGNpocket's Craig Harris) sleeps peacefully as players cost by on rails, unable to take a decent picture of the giant Pokemon as he rests on the ground. The only way to wake Snorlax is to play him a song on the Poke Flute, which isn't attainable until much further in the game. Therefore, players must build points, advance a few levels and grab the flute, at which time it's possible to come back to the Beach, play the flute for Snorlax (Craig), wake him up and snap an award-winning photo. This sort of strategy is common in Pokemon Snap and works wonders to extend the life and replay value of the game.
Players control Todd, a photographer contracted by Professor Oak to travel to Pokemon Island and snap pictures of the Pocket Monsters in their natural habitat. Helping Todd on his adventure is Zero-One, a vehicle built by the professor himself designed with only two goals in mind: One, take Todd for a cruise through all the areas of Pokemon Island and two, keep the Pokemon safe. Because of this, the vehicle comes to a stop whenever players are about to hit a Pocket Monster, giving the creature a chance to escape unhurt.
Todd begins each level with a film roll capable of snapping 60 photos. Players must decide when to take a picture and when to hold off, but they also need to determine what object to use in order to entice the Pokemon to pose for them in any given situation. Some Pocket Monsters, after all, don't respond to the sound of music; others want food; still others only react to pester balls. Each Pokemon may dictate a different course of action in order to capture the best possible picture. Once players are satisfied with the pictures they have snapped, they can take them to Professor Oak for judgement. The better they are, the more he likes them, the more points players are awarded.
Control is very intuitive. As players don't have a say in what direction Zero-One takes them in, nearly all of the buttons are freed up for other purposes. The analog stick is used to control the direction players face as they coast along on rails. The B button throws pester-balls (which are like stink-bombs and generally bother Pokemon). The Z-trigger zooms the camera. The A button throws food (an apple) and, when the Z-button is pressed (thus zooming the camera), the A button snaps photos. C-down plays the flute, which causes certain Pokemon to dance or react and the R button speeds up Zero-One. Everything controls wonderfully and it really is a lot of fun to just try out different methods on the various Pokemon. Or, if you're anything like us, laugh at them after they have been hit with a stink-inducing pester-ball.
Pokemon Snap does have a fair amount of problems, however. The biggest of which lies in game-depth -- or, as it were, lack of it. The title features only seven levels and takes roughly a few hours to complete. Though developer HAL has done its best to enhance replay value with hidden goodies, the overall quest is far too easy.
Courses include:
- Beach
- Tunnel
- Volcano
- River
- Cave
- Valley
- Rainbow Cloud
Imagine each course takes an estimated three to five minutes to run through. There is no getting around it, Pokemon Snap is a short experience.
Worse yet, Pokemaniacs are bound to be disappointed with the selection of Pocket Monsters in the game -- roughly 62 out of a possible 151 in all. It looks as though Nintendo 64 owners will have to wait for the US release of Pokemon Stadium before they'll have the chance to play with all of the monsters.
Pokemon Featured in the Game (and their accompanying number):
- Bulbasaur (001)
- Charmander (004)
- Charmeleon (005)
- Charizard (006)
- Squirtle (007)
- Meatapod (011)
- Butterfree (012)
- Kakuna (014)
- Pidgey (016)
- Pikachu (025)
- Sandshrew (027)
- Sandslash (028)
- Vulpix (037)
- Jigglypuff (039)
- Zubat (041)
- Vileplume (045)
- Diglett (050)
- Dugtrio (051)
- Meowth (052)
- Psyduck (054)
- Mankey (056)
- Growlithe (058)
- Arcanine (059)
- Poliwag (060)
- Weepinbell (070)
- Victreebel (071)
- Geodude (074)
- Graveler (075)
- Rapidash (078)
- Slowpoke (079)
- Slowbro (080)
- Magemite (081)
- Magneton (082)
- Doduo (084)
- Grimer (088)
- Muk (089)
- Shellder (090)
- Cloyster (091)
- Haunter (093)
- Ecectrode (101)
- Koffing (109)
- Chansey (113)
- Kangaskhan (115)
- Goldeen (118)
- Staryu (1200
- Starmie (121)
- Scyther (123)
- Jynx (124)
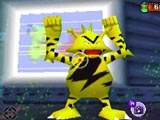
- Electabuzz (125)
- Magmar (126)
- Magikarp (129)
- Gyarados (130)
- Lapras (131)
- Ditto (132)
- Eevee (133)
- Porygon (137)
- Snorlax (143)
- Articuno (144)
- Zapdos (145)
- Moltres (146)
- Dratini (147)
- Dragonite (149)
- Mew (151)
Depth, quite frankly, is our only complaint about Pokemon Snap. Had the game been longer and featured more Pocket Monsters, we would have only criticized the fact that everything runs on rails, which is not really as bothersome as one might think.
Graphics:
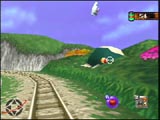
Pokemon Snap takes place in full Polygonal 3D environments with a graphic style that screams, "I might very well be running on the Super Mario 64 engine." What we mean by this is that levels are generally very bright in appearance and polygon models are equally low in detail and construction. This creates a somewhat generic overall 3D terrain that HAL has done its best to avoid with lots of variation in textures and overall atmosphere, but has not been entirely successful. Hills and grass are a clear-cut example of this as both lack proper curves, giving off an appearance that is much more blocky and polygonal than most games of this type.
With all of this said, Pokemon Snap is by no means an ugly game. Think Super Mario 64, add in more texture variety, improved animation and the like. The characters themselves are what really make the experience worthwhile, and they look exactly as they should only in full 3D. You'll laugh wholeheartedly as Pikachu jumps out in front of you in polygonal glory and you send a pester-ball his way, knocking the creature off his feet. Or maybe you won't... but we will.

Sound
Happy. Generic. Funny. All three of these words sum up the audio in Pokemon Snap, which is, for all purposes, neither bad nor particularly good. Throwing objects results in your standard "throw object" sound -- a cross between a beep and a flute. Balls bounce off Pokemon with a clunk. Pikachu says, "Pikachu!" Other Pocket Monsters sing in harmony. It's everything you'd expect and nothing more. On another level, some character reaction sounds are amusing and the music, which is definitely repetitive, is not terribly annoying.
I have to admit that when I first learned of the concept behind Pokemon Snap I was not particularly impressed. I was expecting a game solely intended for a Pokemon-crazed Japanese audience. However, since that time Pikachu and friends have also engulfed the America audience, and the idea of taking pictures of various Pokemon doesn't seem as wacky as it once did.
Developer HAL has done an amazing job of creating an addictive, fun little game out of an undeniably strange concept. The problem with the title isn't its control or its graphics as all of this comes together wonderfully. The problem lies with depth, a facet of gameplay that Pokemon Snap fails to touch on with only seven levels and little more than 60 Pocket Monsters. It's as if HAL ran out of time before it could implement the remaining levels and Pokemon.
Otherwise, Pokemon Snap is an addictive, surprisingly fun gem of an experience that definitely deserves a rent. And parents would certainly be wise to snatch this game up for their kids. As an added bonus, gamers can bring their Pokemon Snap cartridge to participating Blockbuster locations and print up their favorite photos -- which is sure to spawn more hype for the Pokemania craze sweeping the nation.
CODES & TIPS
Angry Jigglypuffs
At the cave level save one or more jigglypuffs . Then at the end of the level throw a pester ball at them or play the flute and watch them get offended.
submitted by Jordan Clark
Arcanine and Growlithe
At the end of the volcano level you'll see 3 small volcanos on your right. Throw pesterballs into all 3. Sometimes a Growlithe will appear and sometimes an Arcanine will appear. It is possible to get three Growlithe and three Arcanine, but that is difficult to do.
submitted by MichaelB abd Tami Willey
Chansey
To get Chansey, go to the beach level. After the bridge and the long grass
Eevee is chasing a white ball throw a Poke food at the ball and if you hit
it, the ball will turn into Chansey.
submitted by Chris Wright (zeke101784@hotmail.com)
Charizard
To photograph a Charizard, throw an apple at the Charmeleon by the lava pool near the end of the volcanic level. If you knock him in the lava he will evolve into a Charizard.
submitted by Pokemaniac
Charmeleon
Volcano Level-
If you want to see a Charmillion before the end of the level, throw an
apple between the Magmar and the Charmander. Magmar will kill Charmander
and he will evolve into Charmillion
submitted by Todd (Nore5413@aol.com)
Dancing Snorlax
While going by Snorlax, play your pokeflute to watch him dance. He will
dance diffrently when you play the different songs on your pokeflute. The
first song scores the highest.
submitted by Tyler Hobson (tylerhobson@hotmail.com)
Ditto
In the begining of the cave level, throw Pesterballs at the Bulbasaurs and they will turn into Ditto.
Double K.O. Magmars
Right after you pass the Moltres egg you`ll see on the right two
Magmars.Throw food between the two Magmars.If done correctly get ready for
some fast photography,because the two Magmars will K.O. each other with
flamethrowers.I got over 5,000 pts.with this shot.If done incorrectly one
magmar will pick up the food and the other will pummel it with flames.A
good shot but only worth 4,000 pts.
submitted by Bean385 (BEan385)
Dragonite
In the valley stage, when you get to the whirlpool, throw some pester balls into it and Dragonite will appear.
submitted by Justin
Dratini
To get a photo of dratini, go to the stage where you photograph the dragonite. Photograph it then throw pester balls to the left of it and a
dratini will pop out.
submitted by gamekiller
Dugtrio
In the Tunnel Stage,photograph the Diglett that pops up next to the Pikachu. The Diglett will run away and then the Pikachu will run after it. Photograph the Diglett again. Repeat this process until Dugtrio finally comes up.
Note: If you miss a photo of Diglett once you will have to start all over again!
submitted by Teef E. Leaf
Get Muk
In the Cave there are two grimers. Take lots of pictures of them. When the third appears near the three bulbasaurs, take a picture. Now throw lots of pester balls at him. He will evolve into Muk.
submitted by Shane
Goldeen
At the beginning of the Valley stage after the squirtle shells, throw pesterballs into the middle of the lake. Goldine will appear and disappear very fast, so Snap fast!
submitted by MichaelB (cybergal2@cybergal.com)
Group of Charmanders
In the volcano level, the Moltres egg will stop your vehicle. You can sit here as long as you want. Throw an apple near a Charmander, and it will tell all it's buddies there's food to be had. Throw food at the other one and he'll call even more. You can get up to six Charmanders, and you can lure them closer with the pokemon food. To get them to hold still and look straight at you for an AWESOME picture, play the Poke Flute.
submitted by KngPikachu
Gyarados
First, at the beginning of the level you have to hit a Magikarp at the Mankey. Then later on, by one of the waterfalls the Magikarp will fall down. Throw a pesterball at it and he will go into the waterfall. Then, out comes a Gyrados.
submitted by Jonathan W (JonnoN64@aol.com)
How to Pass the River Stage
At the end of the level on the right side you see a switch. Above the switch you will see a bump on the wall. Throw a pesterball at it and a
porygon will jump out and land on the switch
submitted by Matt
How to hit the Valley Switch
At the beginning of the level, throw pesterballs at the squirtles to make them leave the river. Further down the river you'll find the squirtles sunning themselves at the base of a steep hill. At the top is a mankey. As you pass the squirtles, throw pesterballs at them, causing them to roll up the hill. If your timing is right, the mankey will fall down and land near the switch. As you approach the switch, throw another pesterball at the mankey, knocking him backwards onto the switch.
Lapras
At the beginning of the beach course, look at the ocean to the right until a Lapras appears. It can barely be seen. Snap it about 5 or 6 times. Then, after the Meowth, focus on the ocean to the right until a Lapras appears more close up. Snap it about 5 or 6 more times. Then, at the bridge, look at the ocean to the right. If no Lapras appears, the trick has worked right. A little while farther at the Kangaskhan, look at the ocean to the right. Two Lapras will appear kind of far away. Snap the one on the right a couple times and another Lapras will appear really close-up for an excellent photo!
submitted by Tami Willey
Magneton
In the tunnel level, throw apples at the 3 magnamites. Lure them together
and they will form a triangle,take a picture and it will be a magneton.
submitted by Dustin (good_987654321@yahoo.com)
Mew
While traveling in the Rainbow Cloud, hit Mew with apples or Pester Balls untill he leaves his Psychic Barrier. As he flies to get back in, throw a Pester Ball at him he will Spin with Sparkles. Keep doing this, it's a Great Photo opportunity!
submitted by Andrew Grey
Mythical Birds
Each of the three birds will be in an egg.
- The first Mythical bird is Moltres (he is in the Volcano level), he will be easy to find since his egg is blocking your path. all you have to do is hit the egg with pokemon food or pester balls and a moltres will emerge from the hot lava
- To get Zapdos you must lure pikachu to the egg sitting in the tunnel then play a pokeflute. If you did it right pikachu will hit the egg and he will shoot the egg out and the egg will blow up revealing Zapdos.
- Articuno: Play your Pokeflute when you see the Jynx and the egg.
submitted by Jimmy Trowbridge
Porygon
In the River past the second Slowpoke turn to your right and thorw pester balls until a Porygon comes out.
submitted by JediMaster1 (Devingreg)
Porygon in its True Colors
About halfway through the River level, you will get a chance to scare two Porygons out from their hiding place. When the come out, they will look like grass and wood. Keep throwing Pester Balls at them, and eventually their camoflauge will fall off and they will look their normal pink and blue colors.
submitted by Chester E. Fumblimhey
Posing Pikachus
It seems everyone's favorite Pokemon is just looking for a photo op. Here's some locations for some very special photographs.
- To see Pikachu rolling on a ball go to the Tunnel. When you start the stage take pictures of the Pikachu immediately. He should move farther down. Keep taking his picture. He will stop and jump on a rolling Electrode.
- To see Speed Pikachu go to the River. At the very end on your left you should see Pikachu hiding behind a tree. Throw an apple at Pikachu and it should fall down. Then he will run back and forth as the Speed Pikachu.
- To see Pikachu surfing go to the Beach. Throw apples at the first Pikachu you see. Throw the apples on the right side of your tracks. There will be a surf board there so try to lead him there. If you do it right he will surf.
- To see Pikachu on a stump go to the Beach stage. The first time you see Meowth chasing a pidgey out of the long grass, throw pester balls into the long grass to get Scyther. After you get Scyther, 2 Pikachus should come out to the stump on your left side. Lead them with apples and play the poke flute.
-
In the cave, towards the end, you will see a zubat carrying Pkachu. Hit the zubat with apples and pesterballs until he drops Pikachu. Pikachu will sprout balloons and fly away.
- Save Pikachu from the Zubat in the Cave and awaken Articuno from his egg by playing the Pokeflute. When you get to the end of the level next to where Jigglypuff's stage is, turn around and you'll see Pikachu riding on Articuno.
submitted by Shawn and Catherine and others
Rainbow Cloud Stage
To get to the secret level (Level #7 The Rainbow Cloud Stage) take pictures of these following landmarks on all of the 6 stages:
- Stage#1 - The Kingler rock formation is on the left after you pass Pikachu's surfboard.
- Stage#2 - The Pinsir shadow will appear some time after you release the Zapdos from the beginning of the level. You will see the Pinser shadow on the right after you pass the second Electabuzz.
- Stage#3 - The Koffing cloud appears on the left at the very beginning of the level. Look for a volcano with purple smoke coming out of it. Toss a few pester balls into the volcano until a face appears.
- Stage#4 - The Cubone rock formation will be above the Vileplume you see (to see the Vileplume play the Pokeflute in front of a large purple bag you see near the beginning of the level.)
- Stage#5 - Mewtwo's energy form will appear on the left soon after you see the Weepinbell.
- Stage#6 - The Dugtrio Rocks are right in front of you when you start the level.
submitted by S4orty and SiLkPiNoY
Sandslash and Sandshrew
On the River stage hit all the Geodudes with Pester Balls. This will allow you to get great shots of them, but it will also bring Sandshrew and Sandslash out of hiding in the ground.
submitted by Aaron (tkarde@aol.com)
Save the Jigglypuff
On Level 5 there will be a koffing chasing a jigglypuff in three different spots. Throw pokemon food or pester balls at the koffing to make them stop. If you free all 3 jigglypuff they will sing for you at the end of the level.
submitted by Akai Sashi
Scyther
In the beach level , when you first see meowth coming out of the grass keep on throwing pester balls into the bushes. when the grass ends u will see leaves poping out and scyther will come out.
submitted by JUdgE Z (Jujekabab@aol.com)
Slowbro
In the River level, lead Slowpoke to the Shellder sign with Pokemon food. It will go fishing. Then a Shellder will bite onto it's tail and it will evolve into Slowbro.
submitted by RaichuShockR (Bulls045@aol.com)
Snorlax
In the beach level when you see the big black blob on the right of Pikachu's surfboard play the poke flute.
submitted by Michael (PitchrMik@AOL.com)
Starmie
Take one picture of Staryu on the valley course. After that follow Staryu to the whirlpool, and you'll Staryu go into it and Starmie will come out.
submitted by Evan Mucasey (EvaN642000)
Victreebell
To take a picture of Victreebell, knock the Weepinbell on the Cave stage into the water where it will evolve into a Victreebell. Take lots of pictures of it. The Weepinbell is found after the three transformed Dittos, which are Bulbasur, you will first run into the Koffing and the Jigglypuff.
submitted by Todd: the Camera Boy
Vileplume
In river on your right you will see a red mushroom inhaling poisinous gas.
Use the poke flute and Vileplume will jump up and start dancing
submitted by pokemaster (jsmith@walgreens.com)
Walkthrough
The Game
You play as Todd, a master camera man on board a specialized vehicle
that traverses the wild jungles of Pokémon Island. So armed with your camera, quick
reflexes and a few items that you will earn along the way – your goal is to take as
many beautiful pictures of Pokémons as you can! That basically sums up the game! Like in a
real life safari – these furry creatures do not exactly hold a pose for you – so
part of the challenge is to lure, attract, knock, frighten, feed and even “kill”
in order for you to get a decent close-up. You get 60 exposures of film per location and
the objective is for you to get the best shots of any given animal and get them assessed
by Prof. Oak to earn points.
The Control and Tools
-----------------------------------------
IN-GAME CONTROLS
-----------------------------------------
Start Button : Pause
- brings up Menu Screen:
R button : Use Dash Engine (secret item that you earn from completing the
Valley level).
C Button : Look Forward / Left / Right in 45 degrees increments
3 D Stick : look around
Z Trigger Button : set up camera
A Button : Take picture
Tools ( you will earn the tools as you progress)
-----------------------------------------
TOOLS
-----------------------------------------
| A Button |
Use Apple |
 |
| B Button |
Use Gas Ball |
 |
| C Down Button |
Use Pokémon Flute |
 |
| R Trigger |
Use Dash Engine |
 |
THE GAME SCREENS
===============================
This is self explanatory as you fiddle around for the first time.
-----------------------------------------
MAIN MENU SCREEN
-----------------------------------------
-----------------------------------------
COURSE SELECT SCREEN *
-----------------------------------------
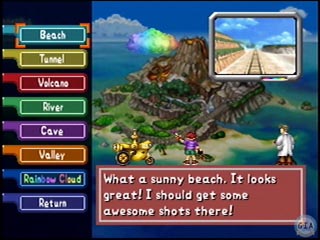
* The courses open as you progress
-----------------------------------------
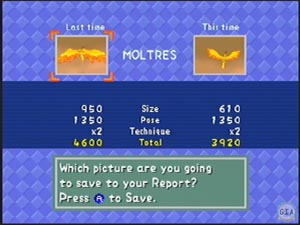
CAMERA CHECK SCREEN
------------------------------------------
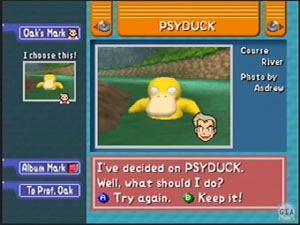
[Prof. Oak's Mark ] : earmark photos to be graded
[Album Mark] : earmark photos for inclusion in the Pokémon Album
[To Prof. Oak] : to grade the earmarked photos
CRITERIA FOR JUDGMENT
[Special] : you will only earn points here if you successfully lure out a
previously unsighted animal
[Size]: make sure the focus dot is on the animal and try to keep it CENTRED and UP CLOSE.
Also try to make sure they FACE YOU.
[Pose] : when you make the Pokémons do something special :eg. like riding a
surfboard
[Technique]:
[Companions]: you earn this when you have pictures of the animal’s companions in the
background.
Eg . 2 pikachu, 2 butterfree, etc. in the same composition.
===============================
ALL THE Pokémon
===============================
I do not repeat any Pokémon species found in earlier levels. I am only listing new
Pokémons found in subsequent levels.
| Beach |
Tunnel |
Volcano |
1. Pidgey
2. Pikachu
3. Meowth
4. Doduo
5. Butterfree
6. Eevee
7. Chansey
8. Snorlax
9. Scyther
10. Lapras
11. Kangaskhan |
1. Voltorb
2. Electabuzz
3. Kakuna
4. Zubat
5. Magnemite
6. Diglett
7. Dugtrio
8. Haunter
9. Magikarp
10. Zapdos |
1. Ponyta
2. Vulpix
3. Magmar
4. Charmander
5. Charmeleon
6. Charizard
7. Arcanine
8. Growlith
9. Moltres |
| River |
Cave |
Valley |
1. Poliwag
2. Slowpoke
3. Slowbro
4. Bulbasaur
5. Shellder
6. Porygon
7. Psyduck
8. Metapod
9. Cloyster
10. Villeplume |
1. Grimer
2. Ditto
3. Koffing
4. Jigglypuff
5. Weepinbell
6. Victreebel
7. Jynx
8. Articuno |
1. Squirtle
2. Mankey
3. Geodude
4. Sandshrew
5. Graveler
6. Sandslash
7. Staryu
8. Starmie
9. Dragonite
10. Goldeen
11. Dratini |
THE GUIDE
===============================
-----------------------------------------
6.1 How To Progress (General)
-----------------------------------------
There are only 2 ways of progressing to the next level:
1. By earning sufficient points through your graded photos; OR
2. By activating a switch
You can only earmark one photo per species so choose well. The guide is divided into
sections according to what you have at the moment. Go to the level you are at and find the
guide with the amount of items you have for the best results.
-----------------------------------------
6.2 The Beach
-----------------------------------------
6.2.1 General
--------------
Progress Type : Earn enough points. If you don’t – repeat ad
infinitum until you do. The next level will open automatically. There are no hidden
switches.
6.2.1.2 What can be found
-------------------------
Many Pidgeys
3 Pikachus (2 hidden)
2 Doduos
1 Eevee
5+ Butterfrees
3 Meowth
2 Lapras
1 Scyther
1 Snorlax
1 Chansey
1 Kangaskhan
6.2.2 Just Camera
-----------------------
Animals to look out for (in sequence):
1. 3 Pidgey at the beginning
2. Doduo flying across from your left
3. Pikachu on your right
4. Butterfree
5. Meowth on the hill to your right – wait till it pounces for maximum points
6.Meowth running out of bushes chasing after a Pidgey
7. A possible 2 Butterfree in a single composition near the bridge
8. Another Doduo from the bushes
9. Another Meowth chasing a Pudgey
10. Eevee on your left chasing the Chansey
11. Look out on your right for the Lapras out in the open sea (random : sometimes 2 will
appear)
12. Kangaskhan that has his back towards you.
13. 2 more Pidgey and a Meowth.
6.2.3 Camera and apples
-----------------------
1. Feed Pikachu with the apples for a good close-up
2. Lure Pikachu to the surfboard with the apples. Try luring him in advance by throwing
the apples ahead of him so that by the time it you pass the surfboard it'll be there for a
good close-up.Can earn 5000-6000 points here!
3.Knock the Meowth to make them dizzy (not much points)
4. Throw apples at Kangaskhan at the end of the level to make it face you. Throw it in
advance so that by the time your vehicle reaches that point he will be up close and facing
you.
6.2.4 Camera with apples and gas ball
----------------------------------------
1. Gas Ball Snorlax to make him briefly take a peek.
2. Knock Meowth off the hill with the Gas ball to make it pose to you on the ground.
3. Continuously throw gas balls at the bushes where there grass is flying/scatttering in
the wind to lure out :
a) a Scyther
b) 2 Pikachu. For added bonus quickly lure the Pikachus with apples for them to pose on
the tree stumps. More points if you can get both Pikachu in the same photo. Easily 6000
points here!
4. Gas ball the white puff being chased by Eevee to turn it into Chansey
6.2.5 Camera with apples, gas ball and flute
----------------------------------------------
1. Play the flute will make the all 3 Pikachu go into an electrical frenzy!
2. Gas ball Snorlax to wake it up and immediately play the flute to make him dance for
you.
3. Gas ball Meowch on the hill as in 6.2.4.2, but this time play the flute to make
him dance on the ground instead of its usual prancing.
4. Keep playing the flute to lure the Lapras closer. If you keep doing that and throw the
occasional Gas ball in the sea -- they should appear very close at the cove near
Kangaskhan. In fact both Lapras will sway to the tune of the flute. Shockingly close!
-----------------------------------------
6.3 THE TUNNEL
-----------------------------------------
6.3.1 General
-------------
Progress Type : Activating a switch at the end of the level. Throw the Gas ball at
the lone Voltrob just before the end of the level to make it explode and open up the
Volcano. You need an apple first before you can do this. Keep playing and Prof. Oak will
eventually give you some. The faster you get decent scores, the faster you get your
apples.
6.3.1.2 What can be found
-------------------------
3 Pikachu
3 Electabuzz
3 Magnemites
Many Voltorbs
Many Kakunas
Diglett
Dugtrio (hidden)
Zapdos (hidden ie. bird in the egg)
2 Zubats
2 Haunters (they look like floating Orbs. Take the pictures and their true form will be
revealed.
1 Magikarp
6.3.2 Just Camera
-----------------
6.3.2.2. Outside
--------------
1. Pikachu on your right. You can make Pikachu play with the Voltorb by taking its
photo early. With every shot it will move forward and eventually climb on a Voltorb.
2. 3 Voltorb.
3. 1 Electabuzz
4. Many Kakuna. You can't get a good shot without the apples.
5. 1 static Voltorb to your left just before the First Door. Easy 4,000 points here.
6.3.2.2 First Door
---------------
1. 1 Zubat. Flying straight at ya!
2. 1 Pikachu
3. 1 Magikarp that flies out of the pond to your right. Good 4,000 points here.
4. 1 Haunter just before the second door.
6.3.2.3 Second Door
----------------
1. 1 Zubat
2. 1 Pikachu playing with 1 Diglett and Dugtrio. Depending on your focus -- you can get
Dugtrio to come out.
3. 2 Electabuzz. Dont bother taking shots because they're too far away.
4. 1 Voltorb to your right just before the end of the Level
5. 3 Magnemite. Again no point without your items.
6.3.3 Camera, apples, Gas Ball and flute
--------------------------------------------
6.3.3.1 Outside
--------
1. Close up on a Kakuna - Slow down the first Electtabuzz by throwing apples at it. This
enables the Kakuna to slide down from the ceiling for a good close-up. Otherwise it'd be
too afraid of the Electabuzz.
6.3.3.2 First Door
-----------
1. Zapdos - Lure Pikachu towards the Egg with apples. When it gets close enough, play
the Flute to make it go into an electrical frenzy and hatch the egg. This bird will
trigger the projection screen at the next room.
6.3.3.3 Second Door
-----------
1. Close-up on the Electabuzz - throw apples on their heads to make it face you and get
close
2. Second Pokémon Sign -- Flute required to enable this sign. Look for it on your right
just after the 2 Electabuzz.
3. Throw apples at the final Voltorb to open the Volcano environment.
4. Throw apples at the Magnemite to make them pose for you.
-----------------------------------------
6.4 The Volcano
-----------------------------------------
6.4.1 General
-----------------
Progress Type : Earn points. No switches.
6.4.1.2 What can be found
-------------------------
5 Ponyta (3 coming at you and 2 at the crater)
3 Vulpix
3 Magmar
2 Charmeleon
At least 8 Charmeleon
2 Charmander
1 Charizard (hidden)
1 Moltres
2 Arcanine (hidden)
1 Grolith (hidden)
6.4.2 Just Camera
-----------------
By the time you get here - you would already have earned your apples.
6.4.3 Camera and apples
-----------------------
1. Prancing Ponyta -- throw an apple in front of them to make them pause and prance.
2. Lure the 3 Vulpix together with apples to get a good picture. Dont throw at it -- aim
at a location where you want them to congregate.
3. 1 Charmander & 1 Magmar. Improvise on every visit. Throw apples to make the the
Magmar burn the Charmander to turn it into Charmeleon. Or lure the Charmander to the
extreme right with food -- it jumps up in elation once fed. Good points for an action
photo.
4. Knock the Charmeleon into the lava pool at the very end of the level. It will turn into
a Charizard! Once it does -- throw apples at it and it will spit flames!
6.4.2 Camera, apples, Gas Ball and flute
---------------------------------------------
1. Pokémon Sign #3. See Section 7.
2. Get stuck behind the egg that blocks your path. Lure the Charmeleons on your left by
throwing apples. You can lure about 10 in all. When they are in a bunch -- lure them
towards you with more apples. Knock them on their heads with items and they will start
"roaring" at you! And when u get the flute -- repeat the same process and when
they are close play the flute. All of them will do a synchronised dance. Very cute!
3. Towards the end of the level you will see three small craters on your right. Gas Ball
each crater (have to be quick) to lure out Growlithe and two Arcanine.
-----------------------------------------
6.5 THE RIVER
-----------------------------------------
6.5.1 General
-----------------
Progress Type : Activating a switch. Throw the Gas ball at hill-side where a sharp
pointy nose is visible just behind the switch. A Porygon will burrow out and activate it.
6.5.2 Quick Tips.
-------------
1. Use Gas balls to chase the Poliwag on the right bank of the river to go forward.
Once they hit the clearing -- throw apples and they will start scurrying towards you and
dive into the river.
2. On the left bank -- look for 3 green Bulbasaur : 2 hidden in a trunk (you can just see
their tops) and one hiding in a fallen log. Gas ball the 2 in the trunk to make them jump
out and lure the one in the log with apples. Get all 3 in one good shot and there will be
plenty of points.
3. You can make the green Metapod slide down from their perch by throwing Gas balls at it.
Try and make the final Metapod block your path so that you can turn 180 degrees and have
time to compose a good group shot of the previous Metapod.
4. 2 Slowpoke on the left bank. They dont react well to any forms of stimulation. I found
that the best points are taken when they stand on their hind legs and moan. They do it
automatically so dont throw anything! Just wait ..
5. To get Slowbro, throw apples to the right of the 2 Slowpoke to make them go to the
brown patch. Once there they will stick their tails in the water to fish out Cloyster
which will clamp on the them and turn them Slowbro.
6. With the flute you can make the Vileplume on your right dance.
7. There are 2 Porygon near the switch -- one green and one brown. The green one is harder
to see but it's found at the leafy green banks. Look for a green pointy nose.
-----------------------------------------
6.6 The Cave
-----------------------------------------
6.6.1 General
-----------------
Progress Type : Earn enough points. If you don’t – repeat some of
the levels until you do. The next level will open automatically. There are no hidden
switches.
6.6.2 Quick Tips
---------------
1. The green Bulbasaur turn into Ditto when you Gas ball them.
2. You can get a good shot of the Grimer appearing to your right when you start the stage
by using the Dash Engine. You can get real close to the third Grimer
3. Save the 3 Jigglypuff being chased by the Koffing. Save all three and they will sing to
you at the end of the level.
4. Knock the Weepinbell into the pool. It will transform into Victreebel.
5. The Flute will make the two Jynx dance and hatch Articuno. Don't be too sidetracked by
Articuno and forget to take the photos of the 2 Jynx as well.
6. You can knock the Zubat that has a Pikachu in its clutches. Afterwards a Pikachu on
balloons will appear!
---------------------------------------
6.7 The Valley
---------------------------------------
6.7.1 General
-----------------
Progress Type : Activating a switch at the end of the level. You will see 3
Squirtle and a Mankey at the top of a hill at the bend just before where the switch is
located. The key is to Gas Ball the last Squirtle ie. left most. Wait till it floats
by and when it is in the right part of your screen, Gas Ball him to make him scamper up
the hill and knock the monkey over. Now Gas ball the said monkey on the other side and
he’ll stomp on the switch. Once you clear this level a scene will transpire telling
you of the Pokémon Signs. Start on a previous environment and you should be getting the
Dash Engine and Flute.
6.7.2 Quick Tips
----------------
1. Immediately at the start of the stage bombard the water in front of you with Gas
balls. You will see 3 Squirtle appearing underneath the water's surface. Try to Gas ball
them out of the water either to the left bank or the right bank. Once they're there,
attract them with apples and get them together for a group shot. Try not to him the apples
at them cos it'll make them dizzy and hence gives them less time to pose for you.
2. Knock the 3 Geodude clinging to the cliff on your right with Gas balls to make 3
Sandslash come out. Experiment on single shots -- take it when the Sandslash are in
mid-air as they burrow out of the ground for good points. Alternatively get them all to
burrow out quickly and get a group shot.
2. Knock the 2 clinging Geodude on the left bank of the river to make the Graveler fall
down. Try to take a pic of the Graveler as it is falling down for an action shot. A
Sandshrew gets bumped out of the ground by this falling Graveler so try to quickly lure it
with apples to get a decent close-up.
3. You can make the three Graveler on the left bank drop down from their perch and stomp
around in circles by playing the Flute.
4. The tip about the Staryu is to take a focused shot -- if u do corectly - it will spin
around in circles and follow you. Do the same for all 3 Staryu and it will follow you to
the whirpool. All three will emerge from the pool Purple in colour as Starmie.
5. Continously Gas ball the whirlpool to make a Dragonite fly out.
6. On your next excursion to the whirlpool -- concentrate on the water to the left of the
whirpool with more Gas balls. 3 Dratini will jump out of the water.
7. At the whirlpool, knock the Magikarp flopping on the land back into the water by
throwing apples at it. A Gyrados will then eat it!
-----------------------------------------
7.0 Rainbow Cloud
-----------------------------------------
7.1 General
-----------------
Progress Type : Once you clear the Valley level – you will be told of the
Pokémon Signs. It is now that a new sub menu will open under the Pokémon REPORT SCREEN.
Find the 6 Pokémon images in the shadows of each level to get to this stage. There
is 1 Pokémon image per environment. You can only get here once you have all the items ie.
apples, smoke-Gas ball, flute and the Dash Engine.
7.1.2 Where to find the 6 signs
---------------------------------
Beach
After passing the first Pikachu on your right , look to your left and you will see a mossy
rock structure which resembles like two curling palms and a head. Focus the middle and
take many many shots. Although there are no animals in sight you will find that you can
still focus and the subject will be labelled as “New”. Get the photo graded and
it will automatically be matched to the Pokémon Signs.
Tunnel
Lure the second Pikachu to move forwards towards the egg by using apples. When he gets
close enough play the flute and Pikachu’s electrical frenzy will hatch the egg. The
bird will then fly to the contraption to trigger the projector mechanism. In the next room
after passing the two tigers – you will see a projection against the rock
wall. Take the photo of the image and get it graded!!
Volcano
Ignore the horses and throw Gas Balls into the volcano pit on the left. When done
correctly, the wisp of smoke that comes out is the Third Pokémon Sign!
River
Just above the dancing mushroom on your right– you will see a tree overlooking it.
Look closely and you will find that the tree resembles the face of another Pokémon. Snap!
Snap! Snap!
Cave
Locate the third Jigglypuff that is being chased by a Koffing. You should see something
sparkling where they are – take the photo. Lots! It should develop into a ghostly
image of another Pokémon!
Valley
When u start the level – just look forward. In the distance you will see the 3
huge rock structures resembling the faces of more Pokémons.
That’s it! This will open the Final Stage where you can take photos of the elusive
Mew!!!